# Misc
# fumo_xor_cli (16 January)
I was so close during the contest. I’d extracted both images I needed for the XOR, but I seem to have assembled the first one backwards. ┭┮﹏┭┮
I’d already noticed the two strips were the same length. No wonder the XOR looked odd…
# The first image
Connecting with netcat gave me a stream of coloured characters. I turned them into images with Pillow and noticed two unusual frames. Looking up the terminal output led me to ANSI escape sequences. For example:
\x1b[38;2;208;243;251m9draws a 9 in the specified colour. The38;2;r;g;bparameters set a true-colour foreground. For example,\x1b[38;2;255;255;0msets the text colour to yellow.
My PNG conversion script was… well, it worked.
from pwn import * | |
from PIL import Image | |
r=remote("124.70.150.39",2333) | |
img=[] | |
k=0 | |
while(k<56): | |
img.append(Image.new("RGB",(133,50))) | |
r.recvuntil(b'\x1b[') | |
s=r.recvuntil(b'\x1b[') | |
j=0 | |
while j<50: | |
i=0 | |
while 1: | |
if s==b'A\x1b[': | |
s=r.recvuntil(b'\x1b[') | |
#print(s) | |
else: | |
s=r.recvuntil(b'\x1b[') | |
#print(s) | |
if b'\n'in s: | |
break | |
#print(s.split(b';')[2:]) | |
pixTuple=(int((s.split(b';')[2:])[0]),int((s.split(b';')[2:])[1]),int((s.split(b';')[2:])[2][:-4])) | |
img[k].putpixel((i,j),pixTuple) | |
i=i+1 | |
j=j+1 | |
img[k].save('/1/%d.png'%(k)) | |
k=k+1 |
That gave me 56 images. Two were conspicuously multicoloured:


# The second image
Lu1u pointed out a URL hidden in the output. At the end of the linked page I found a picture of a fumo:

Zooming in revealed a grid of dots spaced nine pixels apart. Their colours reminded me of the two frames, so I extracted the dots into a new image.
from PIL import Image | |
img0=Image.new('RGB',(100,133)) | |
img1=Image.open('./fumo.png') | |
w,h=img1.size | |
i=1 | |
ni=0 | |
j=1 | |
nj=0 | |
while i<w: | |
j=1 | |
nj=0 | |
while j<h: | |
if(j==1198): | |
break | |
img0.putpixel((ni,nj),img1.getpixel((i,j))) | |
j=j+9 | |
nj=nj+1 | |
i=i+9 | |
ni=ni+1 | |
img0.show() |

# XOR
The first two strips were each 133 × 50 and the dot image was 100 × 133. Put the strips together in the right orientation and the dimensions match. And the challenge was called fumo_xor_cli. Hmm… XOR.
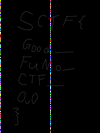
Of course I got the orientation wrong while assembling them. I checked the corner pixels, rotated the strips, joined them and combined the result with the dot image in StegSolve. My rough alignment left the output looking rather worse for wear:
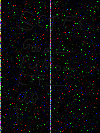
A little work in Photoshop made it easier to read:
# in_the_vaporwaves (17–18 January)
I didn’t know much about audio steganography going into this. I’d used Audacity to inspect audio and do a few basic edits. This challenge used Python’s wave module, which gave me a reason to learn it.
# Inspecting the original
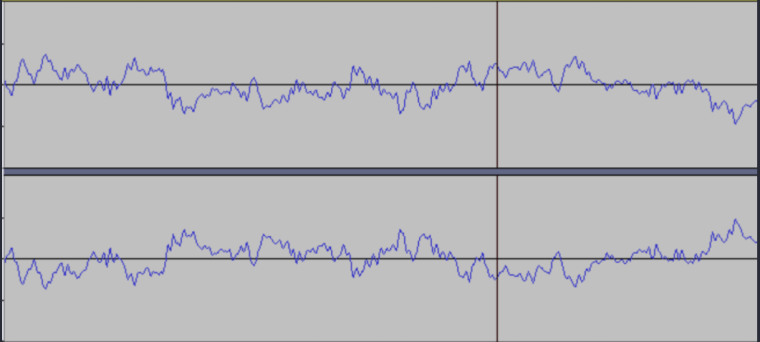
I opened c.wav in Audacity. It sounded a bit noisy, but nothing jumped out. Zooming in, the left and right waveforms looked almost like mirror images:
# 1. Using Python’s wave module
I added the left and right channels and wrote the result to a.wav. The relevant parameters were the channel count (nchannels), sample width in bytes (sampwidth), sampling rate (framerate) and frame count (nframes).
For a WAV writer:
setnchannels(n)sets the channel count.setsampwidth(n)sets the sample width in bytes.setframerate(n)sets the sample rate.writeframes(data)writes the frames and keeps the frame count consistent. On a non-seekable output an inconsistent declared count can cause an error.
For the reader, getnframes() returns the total number of frames. readframes(n) returns up to n frames as bytes.
I also used Python’s struct module. struct.unpack(format, buffer) interprets a buffer according to the format and returns a tuple, even for a single value. The buffer length must match the size returned by struct.calcsize(format) . struct.pack(format, v1, v2, ...) does the reverse and requires the number of values specified by the format.
Here’s the script I wrote following the official write-up:
import wave | |
import struct | |
with wave.open("c.wav",'rb') as c: | |
with wave.open("a.wav",'wb') as a: | |
a.setnchannels(1) | |
a.setsampwidth(2) #此处量化位数应改为 2 | |
a.setframerate(44100) | |
for i in range(c.getnframes()): | |
l,r=struct.unpack('hh', c.readframes(1)) | |
d=l+r | |
a.writeframes(struct.pack('h',d)) |
Running the original settings produced audio like this:
I eventually realised that the write-up set the sample width to one byte. Changing it to two fixed the output. I spent ages thinking the mistake was mine (。_。). Here’s a.wav afterwards:

But 262.9 seconds for one run? I looked for a quicker way.
# 2. Using FFmpeg
I installed FFmpeg on Linux (builds) and mixed the stereo file down to mono:
ffmpeg -i c.wav -f wav -ac 1 -ab 128k -y 1_dan1.wav |
Here’s the waveform from that version:

Pretty similar. At this point it was recognisable Morse audio, which decoded to the flag.
# Reading Morse from audio (19 January)
While I was at it, I tried reading the Morse directly from an audio file in Python. I tested the script on another challenge too. It expects mono Morse audio, so check the channel count before using it. My code is a bit rough, but here it is:
import wave | |
from scipy.io import wavfile | |
filename = 'a.wav' | |
WAVE = wave.open(filename) | |
sample_frequency, audio_sequence = wavfile.read(filename) | |
space=[] | |
voice=[] | |
l1=0 | |
l2=0 | |
for i in range(WAVE.getparams().nframes): | |
if(audio_sequence[i]<=10 and audio_sequence[i]>=-10): | |
l1=l1+1 | |
continue | |
elif((audio_sequence[i-1]<=10 and audio_sequence[i-1]>=-10) and (audio_sequence[i]>10 or audio_sequence[i]<-10)): | |
if l1>1: | |
space.append(l1) | |
l1=0 | |
for i in range(WAVE.getparams().nframes): | |
if(audio_sequence[i]>10 or audio_sequence[i]<-10): | |
l2=l2+1 | |
continue | |
elif((audio_sequence[i-1]>10 or audio_sequence[i-1]<-10) and (audio_sequence[i]<=10 and audio_sequence[i]>=-10) and (audio_sequence[i+1]<=10 and audio_sequence[i+1]>=-10)): | |
voice.append(l2) | |
l2=0 | |
m_s=min(space) | |
M_s=max(space[1:]) | |
m_v=min(voice) | |
def tran(i): | |
if(voice[i]//m_v==1): | |
return '.' | |
else: | |
return '-' | |
Str='' | |
for i in range(len(space)): | |
if(space[i]//m_s==1): | |
Str=Str+tran(i) | |
elif(space[i]>M_s): | |
voice.insert(i,voice[i]) | |
Str=Str+'/' | |
else: | |
Str=Str+tran(i)+'/' | |
Str=Str+tran(len(voice)-1) | |
print (Str) |
# pwn
I accidentally deleted my copies of the pwn challenges. An older student could only give me the files for two of them, which made reproducing the solutions a pain. Luckily the official write-up was detailed enough to work through step by step. It still took me ages ╥﹏╥, but I learned a lot.
# Dataleak (29 January)
It’s been a while. I squeezed in HGAME and the HWS entrance competition (which didn’t get me very far), and of course I put in some serious time slacking off.
The remote challenge asked for 22 bytes of leaked data.
Here’s cJSON_PWN in IDA:
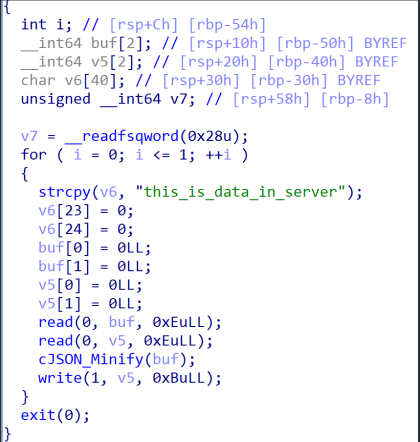
The memory layout was fairly easy to follow.
In declaration order the buffers were buf, v5 and v6. The data I wanted was in v6.
There were two iterations. Each time, buf and v5 received 14 characters apiece, followed by a null terminator.
On each pass, cJSON_Minify() processed buf first. The program then read 11 bytes from v5.
# The vulnerability
I found two issues in the supplied shared library:
- When it saw
/*, the scanner advanced until it reached a null byte(or the closing, which could take it past the buffer.*/)

- Inside a quoted string, a backslash made the scanner advance by two characters.
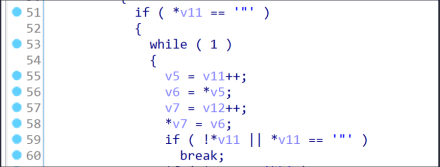
The first case discarded the traversed characters. The remaining text moved up to the start of the comment, overwriting even the opening delimiter. The backslash case skipped forward but preserved the characters it passed.
That left several ways to leak the data. The first bug alone was enough for the whole leak.
# Exploitation
Each read returned only 11 characters, so I needed two reads.
First I had to get past the null terminator at the end of buf so that cJSON_PWN would process v5 as well.
Moving the opening comment delimiter then let me shift the desired data into v5.
# Method 1
To use both bugs, I put the backslash in the last position of buf (character 14). That skipped its terminator and continued into v5.
Putting the opening comment delimiter at the start of v5 then replaced 16 positions, counting the delimiter and the final null byte.
exp1: "aaaaaaaaaaaa\/*aaaaaaaaaaaa
That gave me the first 11 bytes.
To read the second half, I needed to move the first 11 bytes into buf, leaving the remaining 11 in v5.
Trying to do that with the backslash bug seemed far too fiddly (on reflection, probably impossible), so I used the comment bug.
One input started with the comment delimiter, shifting in 16 characters. In the other input I put the delimiter at character six, leaving 11 characters including the terminator.
That moved the first 11 bytes into buf and put the next 11 where the read from v5 would find them.
exp2: /*aaaaaaaaaaaaaaaaa/*aaaaaaa
That gave me the second half. In exp2 the two inputs can actually be reversed: shifting the 16 characters first or the 11 first had the same effect.
# Method 2
My second method changed only how I got the first 11 bytes.
I put the opening delimiter at the end of buf. Including the terminator, four characters would be replaced. To keep the first four bytes of data out of buf, I started v5 with aaaa and put the delimiter after it.
exp: aaaaaaaaaaaa/*aaaa/*aaaaaaaa